#1. position
- static(정적 배치) : 브라우저의 디폴트 배치 방식. left, right, top, bottom 프로퍼티 값은 위피에 영향을 주지 않음
- relative(동적 배치) : 정적 배치(기본 위치)로부터 left, right, top, bottom 프로퍼티 값만큼 이동한 상대 위치

top과 bottom이 동시에 지정되면 bottom이 무시되고,
left와 right가 동시에 지정되면 right가 무시된다.
<!DOCTYPE html>
<html lang="kor">
<head>
<meta charset="UTF-8">
<title>relative</title>
<style>
    div {
        display: inline-block;
        height: 50px;
        width: 50px;
        border: 1px solid lightgray;
        text-align: center;
        color: white;
        background-color: pink;
    }

    #down {
        position: relative;
        left: 20px;
        top: 20px;
        background-color: aqua;
    }

    #up {
        position: relative;
        right: 20px;
        bottom: 20px;
        background-color: aqua;
    }
</style>
</head>
<body>
<h3>상대 배치, relative</h3>
<hr>
<div>T</div>
<div id="down">h</div>
<div>a</div>
<div>n</div>
<div id="up">k</div>
<div>s</div>
</body>
</html>
- absolute(절대 배치) : 부모 태그로부터 left, right, top, bottom 프로퍼티 값만큼 이동한 절대 위치
절대 위치기 때문에 브라우저 크기가 변해도 태그 위치는 변하지 않는다
<!DOCTYPE html>
<html lang="kor">
<head>
<meta charset="UTF-8">
<title>absolute</title>
<style>
    div {
        display: inline-block;
        position: absolute;
        border : 1px solid lightgray;
    }

    div > p {
        display: inline-block;
        position: absolute;
        height: 20px;
        width: 15px;
        background-color: pink;
        border-radius: 50px;
        text-align: center;
    }
</style>
</head>
<body>
<h3>절대 배치, absolute</h3>
<hr>
<div>
    <img src="트리.png" width="200" height="200" alt="트리">
    <!-- width="200" height="200" 이렇게 단위 안쓰면 뒤에 px 붙은 것과 같다 -->
    <p style="left:70px; top:40px">얍</p>
    <p style="right:70px; bottom:60px">얍</p>
    <p style="left:70px; bottom:30px">얍</p>
</div>
</body>
</html>
- fixed(고정 배치) : 뷰포트의 left, right, top, bottom 프로퍼티 값에 고정시키는 배치 방식
#2. float 프로퍼티를 이용한 유동 배치
div { float: right; } :창크기가 줄어도 div는 항상 오른쪽에 위치
#3. z-index(수직으로 쌓기)
div { z-index: 3; } : 프로퍼티 값이 클수록 위에 쌓인다.
<!DOCTYPE html>
<html lang="kor">
<head>
<meta charset="UTF-8">
<title>Document</title>
<style>
    div { position: relative; }
    img { position: absolute; }
    #spadeA {
        z-index: -3;
        left: 10px;
        top: 20px;
    }
    #spade2 {
        z-index: 2;
        left: 40px;
        top: 30px;
    }
    #spade3 {
        z-index: 3;
        left: 80px;
        top: 40px;
    }
    #spade7 {
        z-index: 7;
        left: 120px;
        top: 50px;
    }
</style>
</head>
<body>
<div>
    <img id="spadeA" src="a.png" width="100px" height="140px" alt="스페이드A">
    <img id="spade2" src="2.png" width="100px" height="140px" alt="스페이드2">
    <img id="spade3" src="3.png" width="100px" height="140px" alt="스페이드3">
    <img id="spade7" src="7.png" width="100px" height="140px" alt="스페이드7">
</div>
</body>
</html>
#4. 리스트 꾸미기
- list-style-position: inside | outside;
- list-style-image: url("이미지.png");
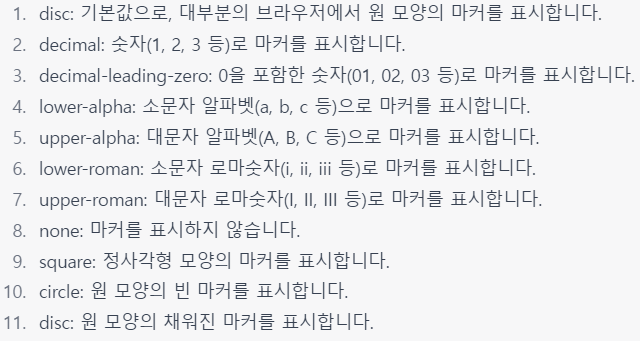
- list-style-type: disc;
- list-style: list-style-type list-style-position list-style-image

#5. 표 꾸미기
- border-collapse: collapse; (이중 테두리 없애기)
- tbody tr:nth-child(even(짝수) | odd(홀수)) { background-color: pink;} (표 줄무늬 만들기)
#6. 폼 꾸미기
<style>
    input[type=text] {
        color: red;
        border: 2px solid skyblue;
        border-radius: 5px;
    }
    input[type=text]:hover {
        background-color: aliceblue;
    }
    input[type=text]:focus {
        font-size: 120%;
    }
    /* 포커스는 키 입력에 대한 독점권을 뜻한다. 폼 요소 중 하나만 포커스를 가진다.
    :focus는 폼 요소가 포커스를 받을 때 스타일을 입히는 셀렉터이다. */
</style>
#7. 애니메이션